42. Magnets


MATERIALS
    Large Magnetic sheet with adhesive back
    artwork
    adhesive laminating sheets (optional)

FOR THE GARDENER
  1. print out images from the garden
  2. trim the images out, leaving 1/4 inch boarder
  3. peal off adhesive backing from magnetic sheet & adhere the trimmed images to the sheet
  4. trim magnetic sheet to size
  5. if you like, seal the image with sticky-back sheet laminate.


FOR THE WORDSMITH
You can create your own magnetic poetry
  1. write or print out a list of words (or use this downloadable printable)
  2. adhere the list to the magnetic sheet
  3. cut the words/magnet to size


FOR THE COMIC BOOK AFICIONADO

print out the downloadable art:


Adhere prints to magnetic sheet & cut out


41. Fabulously Funky Coasters


MATERIALS

    Downloadable Art [PDF automatically downloads when you click the link]
    Photo paper or sturdy cardstock
    Scissors
    Craft glue (optional)
    Self-laminating sheets or adhesive vinyl (both optional)
    Cork (optional)


INSTRUCTIONS
  1. Go to the File menu and select Print. Load the cardstock into the printer, following the printer's directions. Print the coaster sheet.
  2. Cut out the coasters.
  3. Glue each coaster to a piece of cork backing using craft glue.
  4. Let the coasters dry, then spray each one with a paper protectant.

    You can also design your own coasters.
    Print the images in color, trim around the edges, laminate or coat them to protect from spills, and add a cork bottom.

Source: Microsoft.com


40. Photo Calendar


MATERIALS
    Matte paper
    Inkjet Printer
    Photos to upload


INSTRUCTIONS
  1. Follow the instructions provided by Calendar Labs.
  2. download and print calendar pages.


Source: Calendar Labs


39. Wheat Grass Planter


MATERIALS
    Wheat Grass Seed OR Millet Seed
    Clay Pot and Saucer (or other container of choice)
    Potting Soil


INSTRUCTIONS
  1. Fill the container with potting soil, leaving a good amount of space at the top (at least three inches). As the grass grows, it will push up dirt. If you don’t leave enough space, dirt will fall out of the container onto your table top!
  2. Put a layer of wheat grass seed on top of the soil. Use a generous amount in a single layer over the potting soil. Cover the seeds with a bit of potting soil. You don’t need too much soil, just enough to cover the seeds.
  3. Repeat step 2, making a second layer of grass seed and soil.
  4. Water well and keep the soil moist. Wheat grass will grow best in a bright room.


Tips & Techniqes
  • Wheat grass grows very fast. In less than a week you’ll have about an inch of grass. Millet grows slower.
  • Keep the soil moist but not wet. If you plant wheat grass in a container with no drainage (such as glass), we recommend misting the grass rather than watering.
  • Depending on how much sun your arrangement gets, they will last from 5 to 10 weeks. Since they grow so quickly, just replant your pots and you’ll have new arrangements in no time.
  • Cats love wheat grass! It aids their digestive systems and is often prescribed by veterinarians.
  • Wheat grass is sold in health food stores for juicing.


38. Flavored Vinegars


MATERIALS
    Knife
    Funnel
    Decorative bottles with corks or sealable tops


INGREDIENTS
    TARRAGON VINEGAR
      4 cups apple cider vinegar
      3 large sprigs fresh tarragon


    RASPBERRY VINEGAR
      4 cups white wine vinegar
      1-1/2 cups fresh or frozen raspberries


    ROSERMARY GARLIC VINEGAR
      1 cup red or white wine vinegar
      4-5 peeled whole garlic cloves
      4 sprigs fresh rosemary


INSTRUCTIONS
    The process is simple. Cut your ingredients to a size that will be completely submerged in the liquid. Put ingredients into clean bottles and pour red or white wine vinegar over them. Cap the bottles and store in a cool, dark place for at least three weeks. If you don't have that much time, you can speed the process up somewhat by heating the vinegar till it's lukewarm and pouring it over ingredients that have been chopped or crushed. Store this in a cool dry place for at least ten days, then strain and discard the chopped or crushed ingredients from the vinegar. Return the vinegar to a cleaned bottle and add new "whole" ingredients.

    Make your own labels by cutting strips of white or colored paper and writing the vinegar flavor on it. Attach with glue or rubber cement. Make a paper strip that can fold over the top of the bottle as well (see image).


Resources: about.com 


If you like making infused vinegars, you might want to check out this fun book:

Flavored Vinegars 50 Recipes For Cooking
by Daniel Proctor and Michael and Penelope Wisner Trade Paperback
Powells.com


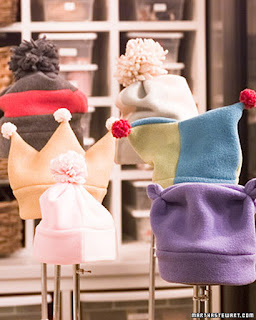
37. Fleece Hat


MATERIALS

    Soft tape measure
    Fleece fabric
    Pins
    Strong matching thread
    Scissors
    Sewing machine


INSTRUCTIONS

    Vertical-Stripe Hat
    1. Measure the circumference of your head (around your ears). If you’re making the hat as a gift for someone and don’t know his or her size, use our size chart below. You’ll need four fabric panels, two of each color. To determine the width of the panels, divide the head circumference by four, and add 1/4 inch on each side for seam allowance. The length for an adult hat should be about 13 inches; for a child’s hat, about 10 inches. Cut out the panels.
    2. Pin the right sides of the long ends of the panels together, alternating the colors. Sew panels together, leaving a 1/4-inch seam allowance. Sew the end panels, right sides together to form a tube.
    3. Trim seam allowance closely. Use your fingers to open the seams; do not use an iron to press them, or the fabric could melt.
    4. Flatten the hat, right sides together, so that two panels lay directly on top of the other two panels. Match up the center seams.
    5. To make the hat’s cuff, fold fabric up about 3 inches; fold in again 1/4 inch. Sew hem close to the turned edge. Turn hat right side out.
    6. Pin along the top of the hat and sew, leaving a 1/4-inch seam allowance. Trim seam.
    7. Join the two corners of the top of the hat together with a single stitch. Using strong thread, bring the needle through the inside of one corner and down through the other. Pull thread tight so the corners meet at the center. Tie off the thread.


    Solid-Color Hat
    1. You’ll need one panel of fabric to make this hat. To determine the width of the panel, measure the circumference of your head (around your ears), or use our size chart below; add 1/4 inch on each side for seam allowance. The length for an adult hat should be about 13 inches; for a child’s hat, about 10 inches. Cut out the panel.
    2. Sew the long ends, right sides together, to form a tube.
    3. Trim seam allowance closely. Use your fingers to open the seams; do not use an iron to press them, or the fabric could melt.
    4. To make the hat’s cuff, fold fabric up about 3 inches; fold in again 1/4 inch. Sew hem close to the turned edge. Turn hat right side out.
    5. Sew along the top of the hat, leaving a 1/4-inch seam allowance. Trim seam.
    6. Join the two corners of the top of the hat together with a single stitch. Using strong thread, bring the needle through the inside of one corner and through the other point. Pull thread tight so the corners meet at the center. Tie off the thread.


    Horizontal-Stripe Hat
      Follow the instructions for the solid-color hat, but combine horizontal bands of different-colored fleece to equal the correct height (about 13 inches for adults and 10 inches for children). Use as many bands as you like in any width; allow 1/4 inch for seam allowance on the top and bottom of each band, and 3 inches to the bottom band for the hat’s cuff.


    Jester Hat
    1. Follow steps 1 to 4 for the vertical-stripe hat above.
    2. Measure the crown of your head (ear to ear as if for earmuffs) or use our chart below. Place one end of a soft tape measure at the bottom left corner of the hat, extend tape measure to the right corner of the hat, the distance equal to your crown measurement (for example, 14 inches if your crown measurement equals that). Hold both points of the tape measure in place, and arch the excess in between. Pin on the center seam, 3 inches above the highest point of the arc; that is your “low point.”
    3. Mark the side seams 1 1/2 inches higher than the low point for a child’s hat, 2 inches higher for an adult’s. Connect the high points and low point with a marker, making a V. Sew along the V, making sure center seams match up. Trim seams, turn right side out, and shape points. Attach small pom-poms to each point (pom-pom instructions below).


    Pom-pom
    1. For a large pom-pom, cut a strip of fleece 24 inches in length (9 to 12 inches for a smaller pom-pom) and as wide as you would like the pom-pom to be, (our pom-pom for an adult hat is 4 inches wide). Fold the strip in half widthwise.
    2. Lightly draw a line down the center of the fabric lengthwise. Cut fringes to the left and right of the line, leaving about 1/4 inch uncut in the center. The fringes can be as narrow or as wide as you like.
    3. Roll up strip of fabric.
    4. Using strong thread such as upholstery thread, bring the needle through the core of the pom-pom, and wrap the thread tightly around the center a few times. Bring needle through the core again, and tie a knot as close to the pom-pom as possible. Use the excess thread to sew the pom-pom to the top of the hat.


AVERAGE HEAD SIZES
    Newborn (6 months and younger)
    Circumference: 14 to 17 inches
    Crown: 8 to 10 inches

    Infant (6 to 12 months)
    Circumference: 16 to 19 inches
    Crown: 11 to 12 inches

    Child (12 months to 3 years)
    Circumference: 18 to 20 inches
    Crown: 11 to 12 inches

    Child (3 years and older)
    Circumference: 20 to 22 inches
    Crown: 13 to 14 inches

    Adult Woman
    Circumference: 21 to 23 1/2 inches
    Crown: 13 to 15 inches

    Adult Man
    Circumference: 22 to 24 1/2 inches
    Crown: 14 to 16 inches


36. Vintage Seed Packets


MATERIALS
    HP Photo paper or other stiff paper
    Vintage Seed Packet Art:

    Glue
    Scissors


INSTRUCTIONS
  1. Print on photo paper or other stiff paper.
  2. Cut out packets along lines.
  3. Glue where indicated. Let dry.
  4. Drop seeds in packet and secure top flap.

    Fill the packets with your favorite seeds either from your garden, or from the store.


35. Gardener's Tote or Apron


MATERIALS
    Iron-on transfer paper
    Ink jet printer
    Apron (or tote bag)
    Iron & Ironing board
    Iron-on pattern:


INSTRUCTIONS

  1. Wash, dry, and iron Apron. (If you're ironing a transfer onto a tote bag, you don't need to wash it.)
  2. Open up one of the image files and flip it horizontal so the image is mirrored.
    1. On a Mac, if you open the image in Preview, go to the "Tools" menu, then click on "Flip Horizontal"
    2. If opening in Picture Manager or Office: go to the Formatting toolbar and click on Edit Pictures. Then click on "Rotate and Flip." From there, click on "Flip Horizontal."
  3. Print out the mirrored image onto the iron-transfer paper.
  4. place your Apron (or bag) on the Ironing board, and lay the transfer, image side down, over the apron where you want it to appear.
  5. follow the instructions for the Iron-on transfer paper.

    If the Apron has pockets, why not fill them with a dish towel & some wooden spoons for your cook, or gardening gloves, seed packets, and tools for your gardener.

Vintage Garden Images

Click on any of the images to view larger. Right click or control click on the images to download to your desktop (or just drag and drop to your desktop).


34. Felted Wool Mittens


Felting wool means shrinking it—on purpose! While results will vary from one type of wool to another, most will shrink quite dramatically and take on a tighter feeling, felt-like finish. The key is, you must use 100% WOOL fabric. Grab a few old all-wool sweaters from your closet or a second-hand store—the kind with holes in the elbows, or stretched out edges. With just a little effort, you can transform an "undesirable" into a pair of funky (and functional!) mittens. Here's how.


MATERIALS

    At least one old 100% wool sweater (as long as you're going to the effort, you might as well felt a few - up to four or five will fit in the washing machine)

    A bit of dishwasher detergent (not dish soap!)

    Pattern tracing material

    J & P Coats embroidery floss or Red Heart Yarn


INSTRUCTIONS

Before You Sew:

    Loosely arrange the sweaters in the washing machine. Add a small amount (maybe 1/8 - 1/4 cup) of dishwashing detergent, then fill the machine using a "hot water wash/cold water rinse" cycle.

    Machine dry the sweaters on the hottest temperature setting.


Ready, Set, Sew:

    Make a mitten pattern by tracing your own hand (or someone else's) onto pattern tracing material.

    Lay out the pattern on your felted sweater, playing with placement until you find just the right look. Sweaters with multi-colored designs or special stitches, like cable knits, offer lots of possibilities—enjoy! You can also utilize the ribbing on a sweater's lower edge, though don't expect it to be particularly functional. Once the sweater is felted, much of the stretch is long gone. So you'll find these mittens aren't snug fitting. But they are very cool—and warm at the same time!

    Cut two mittens on a double-layer of fabric. Using a 1/4" seam allowance, stitch each set together along the outer edge using a straight running stitch, whipstitch or blanket stitch. Perfect stitches NOT required. You can also machine stitch using a long stitch length (5.0mm).

    To do the running stitch, use yarn or heavy thread like embroidery floss—all strands in the skein—and a large-eyed needle. Then just run the needle in and out of the fabric.


    If desired, add a final row of the running stitches around the "cuff" area, gathering slightly and finishing with a bow. Or add button embellishments—whatever your pleasure.


Original source: SYSF
New source: Dabbled

[Edit 12/16] The original source for this project appears to no longer be on the Web, although the instructions are pretty easy to follow. You can also find similar instructions (with pictures) at Dabbled.org.


If you like green / eco-conscious gifts, you might want to check out:

Big Green Book of Recycled Crafts (Leisure Arts #4802)
by House, Allan Ed. and Leisure Arts and Leisure ArtsTrade Paperback
Powells.com


33. Cheery Knit Cap


SKILL LEVEL: Beginner

SIZE: Small, Large
    Circumference 13 (16) inches [33 (40.5) cm] Note: Hat is very stretchy.
    Note: Pattern is written for smallest size with changes for larger sizes in parentheses. When only one number is given, it applies to all sizes. To follow pattern more easily, circle all numbers pertaining to your size before beginning.


MATERIALS
    220-213 Fancy Fur: Rainbow Red 1 Skein
    Lion Brand Knitting Needles- Size 13 [9 mm]
    Large-Eye Blunt Needles (Set of 6)


GAUGE:

    10 stitches + 12 rows = 4 inches (10 cm) in stockinette stitch (straight needles: knit on right side, purl on wrong side) (double-pointed needles: knit every round). BE SURE TO CHECK YOUR GAUGE.


Double-Pointed Needle Hat
    Cast on 32 (40) stitches onto 3 or 4 needles. Join and knit every round (stockinette stitch) until hat measures 6 (7) inches from beginning.
    Begin crown shaping as follows:
    Round 1 *Knit 6 (8), knit 2 together; repeat from the * to end – 28 (36) stitches.
    Round 2 Knit.
    Round 3 *Knit 5 (7), knit 2 together; repeat from the * to end – 24 (32) stitches.
    Round 4 Knit.
    Round 5 *Knit 4 (6), knit 2 together; repeat from the * to end – 20 (28) stitches.
    Round 6 *Knit 3 (5), knit 2 together; repeat from the * to end – 16 (24) stitches.
    Round 7 *Knit 2 (4), knit 2 together; repeat from the * to end – 12 (20) stitches.
    Round 8 *Knit 1 (3), knit 2 together; repeat from the * to end – 8 (16) stitches.

    (Large size only) Next Round *Knit 2, knit 2 together; repeat from the * to end – 12 stitches.

    Next Round *Knit 2 together; repeat from the * to end – 4 (6) stitches.
    Next Round *Knit 2 together; repeat from the * to end – 2 (3) stitches.
    Knit 2 (3) together. Fasten off.
    Cut yarn. Draw yarn tail through last remaining stitch using large-eyed, blunt needle and tighten. Weave in ends.


Straight needle Hat
    Cast on 32 (40) stitches. Knit 1 row, then purl 1 row (stockinette stitch), until Hat measures 6 (7) inches from beginning.
    Begin crown shaping as follows:
    Row 1 *Knit 6 (8), knit 2 together; repeat from the * to end – 28 (36) stitches.
    Row 2 Purl.
    Row 3 *Knit 5 (7), knit 2 together; repeat from the * to end – 24 (32) stitches.
    Row 4 Purl.
    Row 5 *Knit 4 (6), knit 2 together; repeat from the * to end – 20 (28) stitches.
    Row 6 *Purl 2 together, purl 3 (5); repeat from the * to end – 16 (24) stitches.
    Row 7 *Knit 2 (4), knit 2 together; repeat from the * to end – 12 (20) stitches.
    Row 8 *Purl 2 together, purl 1 (3); repeat from the * to end – 8 (16) stitches.

    (Large size only) Next Row *Knit 2, knit 2 together; repeat from the * to end – 12 stitches. Purl 1 row.

    Next Row *Knit 2 together; repeat from the * to end – 4 (6) stitches.
    Next Row *Purl 2 together; repeat from the * to end – 2 (3) stitches.
    Knit 2 (3) together. Fasten off.

    Cut yarn. Draw yarn tail through last remaining stitch using large-eyed, blunt needle and tighten. Cut yarn. Sew back Hat seam. Weave in ends.


32. Carousel Knit Cap


CAROUSEL HAT

SKILL LEVEL: Easy

MATERIALS
    620-177 Wool-Ease®: Loden 1 Skein - (A)
    620-171 Wool-Ease: Gold 1 Skein - (B)
    620-137 Wool-Ease: Fuchsia 1 Skein - (C)
    620-179 Wool-Ease®: Chestnut Heather 1 Skein - (D)
    Lion Brand Knitting Needles- Size 8 [5 mm]
    Lion Brand Crochet Hook - Size H-8
    Large-Eye Blunt Needles (Set of 6)

SIZE: Small, Medium, Large
    20" (21", 22") [51 (53.5, 56) cm] circumference x 7½" (7¾ inches, 8") [19 (19.5, 20.5) cm] depth
    Note: Pattern is written for smallest size with changes for larger sizes in parentheses. When only one number is given, it applies to all sizes. To follow pattern more easily, circle all numbers pertaining to your size before beginning.


GAUGE:
    18 stitches + 36 rows = 4" (10 cm) over garter stitch (knit every row). BE SURE TO CHECK YOUR GAUGE.


NOTES:
    When working Stripe Pattern 1, carry colors up along the side edge until the last stripe is completed, then cut all but color A.
    When working Stripe Pattern 2, carry color up along the side edge until the last stripe of that color is completed, then cut color.
    Join new colors as needed.


HAT
    With A, cast on 85 (89, 93) stitches.

Brim
    Knit 1 row and mark as wrong side. Continue in garter stitch and Stripe Pattern 1 as follows: *Work 2 rows each using B, C, D, and A; repeat from * once more. Cut all colors except A.


Body
    Knit 5 (7, 9) more rows using A. Note What was the wrong side of the brim is now the right side of body. Continue in garter stitch and work Stripe Pattern 2 as follows: 2 rows B, 2 rows A, 6 rows B, 2 rows C, 2 rows B, 6 rows C, 2 rows D, 2 rows C, 6 rows D, 2 rows A, 2 rows D and 6 rows A.


Crown Shaping
    Repeat start of Stripe Pattern 2 and, AT SAME TIME, shape crown as follows:
    Row 1 (Right Side) *Knit 19 (20, 21), knit 2 together; repeat from *, ending knit 1—81 (85, 89) stitches total.
    Row 2 and all Wrong Side Rows Knit.
    Row 3 *Knit 18 (19, 20), knit 2 together; repeat from *, ending knit 1—77 (81, 85) stitches total.
    Row 5 *Knit 17 (18, 19), knit 2 together; repeat from *, ending knit 1—73 (77, 81) stitches total.
    Row 7 *Knit 16 (17, 18), knit 2 together; repeat from *, ending knit 1—69 (73, 77) stitches total.
    Row 9 *Knit 15 (16, 17), knit 2 together; repeat from *, ending knit 1—65 (69, 73) stitches total.
    Row 11 *Knit 14 (15, 16), knit 2 together; repeat from *, ending knit 1—61 (65, 69) stitches total.
    Row 13 *Knit 13 (14, 15), knit 2 together; repeat from *, ending knit 1—57 (61, 65) stitches total.
    Row 15 *Knit 5 (4, 6), knit 2 together; repeat from *, ending knit 1—49 (51, 57) stitches total.
    Row 17 *Knit 4 (5, 5), knit 2 together; repeat from *, ending knit 1—41 (41, 49) stitches total.
    Row 19 *Knit 3 (3, 4), knit 2 together; repeat from *, ending knit 1—33 (33, 41) stitches total.
    Row 21 *Knit 2 (2, 3), knit 2 together; repeat from *, ending knit 1—25 (25, 33) stitches total.
    Row 23 *Knit 1 (1, 2), knit 2 together; repeat from *, ending knit 1—17 (17, 25) stitches total.
    Row 25 FOR SIZE LARGE ONLY *Knit 1, knit 2 together; repeat from *, ending knit 1—17 stitches total.
    Rows 25 (25, 27) [Knit 2 together] 8 times, knit 1—9 stitches total. Cut yarn leaving a long tail for sewing. Thread tail into large-eyed, blunt needle and weave through remaining stitches. Pull tight to gather, fasten securely. Sew back seam, reversing seam for brim so seam falls to wrong side.


Finishing
    Position hat so the right side of brim is facing and the cast-on edge is at the top. With crochet hook, join A with a slip stitch in the back seam, *chain 4 for trim, work 4 half double crochet in the 2nd chain from hook, slip stitch in the next 2 chain, then slip stitch in the same stitch as the slip stitch at the base of trim, slip stitch in the next 3 stitches of the cast-on edge; repeat from * around. Join round with a slip stitch in the first slip stitch. Fasten off. Weave in ends.


(you'll need to set up a free account in order to access the free patterns)


For more knitting fun:

Stitch N Bitch The Knitters Handbook
by Debbie StollerTrade Paperback
Powells.com


31. Bookplates


There are lots of places online with free downloadable bookplates, including:

  1. For the Child in all of us, there's Bookplates from My Home Library.
  2. From The DIY Librarian
  3. From Besotted Blog
  4. From RedBubble


30. Button Clock


MATERIALS
    Round cookie-tin lid
    Awl
    Nail set
    Dial template
    12 buttons in various sizes, shapes, and colors
    Multipurpose cement
    Clock movement


INSTRUCTIONS
  1. Poke a hole through the center of the lid with an awl. Using a nail set, widen the hole to accommodate the shaft.
  2. Refer to the dial template to position the button hour markers. Affix buttons with multipurpose cement. To assemble mechanism, follow manufacturer’s instructions.


Want more Martha Stewart crafts? Why not check out her encyclopedia of crafts:


29. Fortune Cookies


INGREDIENTS
    1 egg white
    1/8 teaspoon vanilla extract
    1 pinch salt
    1/4 cup unbleached all-purpose flour
    1/4 cup white sugar

    12 small strips of paper (approx. 1/2 in x 4 in), with hand written fortunes
    A glass jar


INSTRUCTIONS

  1. Preheat oven to 400 degrees F. Butter a cookie sheet. Write fortunes on strips of paper about 4 inches long and 1/2 inch wide. Generously grease 2 cookie sheets.
  2. Mix the egg white and vanilla until foamy but not stiff. Sift the flour, salt, and sugar and blend into the egg white mixture.
  3. Place teaspoonfuls of the batter at least 4 inches apart on one of the prepared cookie sheets. Tilt the sheet to move the batter into round shapes about 3 inches in diameter. Be careful to make batter as round and even as possible. Do not make too many, because the cookie have to be really hot to form them and once they cool it is too late. Start with 2 or 3 to a sheet and see how many you can do.
  4. Bake for 5 minutes or until cookie has turned a golden color 1/2 inch wide around the outer edge of the circle. The center will remain pale. While one sheet is baking, prepare the other.
  5. Remove from oven and quickly move cookie with a wide spatula and place upside down on a wooden board. Quickly place the fortune on the cookie, close to the middle and fold the cookie in half. Place the folded edge across the rim of a measuring cup and pull the pointed edges down, one on the inside of the cup and one on the outside. Place folded cookies into the cups of a muffin tin or egg carton to hold their shape until firm.

    Once you've made the cookies, place as many as you like into a glass jar, seal it, and affix a handmade label on the front.


28. "Little Treasures" Gift Box


MATERIAL

    2 8x8 squares of fabric (your choice of colors)
    2 8x8 squares of fusible web
    1 8x8 square pellon
    straight pins
    parchment paper or Teflon sheet
    Iron & Ironing board
    freezer paper
    scissors
    Rotary cutter (optional)
    Fray Check
    Sewing machine
    embellishments of your choice


INSTRUCTIONS

  1. Select 2 fabrics, 1 for the outside of your box and 1 for the lining, and cut an 8" x 8" square of each. You can use fabrics that you have altered with paint or dye, or select commercial fabrics.
  2. Cut two 8" x 8" squares of fusible web and one 8" x 8" piece of Pellon.
  3. Make a sandwich of the 5 pieces: first, put down the lining fabric, wrong side up, then add a piece of fusible web, then the Pellon, another piece of fusible web, and finally the fabric for the outside of your box, right-side up.
  4. Place a piece of parchment paper or a Teflon sheet on your ironing board to protect it from the fusible web, put the fabric sandwich on top of it, and place another sheet of parchment on top of the sandwich to protect your iron. Following the directions for the fusible web, iron your fabric sandwich until all layers adhere. You will probably need to press one side and then flip the fabric sandwich over and press the other side.
  5. Trace the pattern of the box onto the dull side of the freezer paper and cut it out.
  6. Iron the freezer paper pattern (shiny side down) onto the fabric sandwich and cut out your box. Cut carefully - this step will make the difference between an elegant piece of art and a misshapen little box. (An 18mm rotary cutter may be helpful to cut the sides of each slit and embroidery scissors to cut the ends of the slits.)
  7. Sew close to all of the raw edges, including the slits. (I found that a straight stitch caused less fraying than a zigzag stitch.)
  8. Put Fray Check on the raw edges of the "knobs" at the top of the box because they get a lot of use and tend to fray.
  9. If desired, use a foam brush to paint the edges of the box with fabric paint to cover any white from the Pellon or fusible web that may show. Using a metallic bronze, gold, or copper acrylic paint will give your box a "gilded" look.
  10. Embellish, as desired. Create designs and interest with piping, bobbin work, Swarovski crystals, beads, braid, sequins, glitter paint, and more. Remember that whatever you sew on the front will show up on the lining.
  11. To construct the box, pull the 2 swirl-shaped petals together. Holding them with one hand, bring one of the petals with a slit up and over the top of the swirl petals. Last, bring the other slit petal up and over the other three petals.


For more quilting fun:

27. Tea Gift Basket


If you have a friend that enjoys tea, this is a fun and easy gift to assemble:

MATERIALS
    a pair of tea cups with saucers
      (these are prolific at thrift stores, and usually fairly inexpensive - the saucers are optional)

    a small basket (big enough for the two tea cups)
    2-3 tea bags per cup
      (you don't have to include the entire box of tea)

    Tea Bag envelopes [courtesy of Marilyn Scott Waters]
      They can be printed out in Red & Blue or Pink & Green

    Demerara (raw sugar) cubes or Honey sticks
    Cellophane (not plastic wrap)
    Tea Biscuits (recipe follows)
    raffia or ribbon


INSTRUCTIONS
  1. print the Tea Bag envelopes, cut them out and assemble
  2. insert tea bags into envelopes & place in tea cups
  3. assemble everything in the basket
  4. place basket on unrolled cellophane
  5. cut a piece of cellophane large enough to gather around the basket
  6. tie raffia or ribbon around the top of the cellophane.

    note: if you like you can assemble ingredients into the tea cups and wrap them with cellophane (& do without the basket)


TEA BISCUIT RECIPE

    INGREDIENTS
      4 c. flour
      3/4 c. sugar
      3 tsp. baking powder
      1/2 tsp. salt
      3 eggs, slightly beaten
      1/2 c. oil
      1 tsp. vanilla
      1/4 c. orange juice
      1/4 lb. butter, softened
      Sugar


    1. Preheat oven to 375º
    2. Sift the first 4 ingredients together onto a piece of wax paper.
    3. Make a well in the center with walls high enough to contain the liquid ingredients;
    4. add eggs, oil, vanilla, and orange juice.
    5. Knead dough very lightly for a few seconds on a lightly floured board.
    6. Pat the dough gently and cut the dough with a floured cutter.
    7. Place biscuits on a greased cookie sheet.
    8. Bake at 375º F for 15-20 minutes. The tea biscuits should rise and be lightly brown in color.
    9. When done, and still warm, sprinkle tops with sugar.

    Recipe Source: Cooks.com


And for more fun gifts:

Gifts In A Jar Holiday Fun
by Sarah Givins (Spiral/Comb)
Powells.com

26. Best Thought Cards


Here's a collection of printable cards from Marilyn Scott Waters - created to encourage friends. They're primarily aimed at women/moms, but there is a set of blank cards you can print out & make up your own encouragements.

  1. Set One [PDF]
  2. Set Two [PDF]
  3. Set Three —quotes [PDF]
  4. Blank Set
  5. Best Thoughts Envelope


25. Handmade Christmas Ornaments


There are a plethora of ways to create handmade ornaments, here are a couple of ideas.

Wired Star Ornament:

    MATERIALS
  • a piece of paper and 
  • pencil, 
  • a piece of wood (read instructions for more specific information about the wood), 
  • tape, 
  • a small piece of colored tape (painter’s tape or washi tape would work), 
  • 6 nails 
  • a drill with a drill bit the same diameter as the nails


INSTRUCTIONS
  1. Draw the star outline that you want to replicate in your ornament on a piece of paper.  Make sure it’s the appropriate size for your tree, but ours was about 4 inches tall.
  2. Find a piece of wood that’s large enough to fit the outline and tall enough that you can drill small holes for nails to fit into without going all the way through the wood.
  3. Tape the paper to the wood.
  4. Select a drill bit that’s the same size as your nails. You want to be able to pull the nails in and out of the wood with some effort. They still need to be pretty firmly anchored in the wood.
  5. Tape off your drill bit so that the bottom of the tape signals when you want to stop drilling. You don’t want the holes to go all the way through the wood.
  6. Drill into each of the 5 points of the star. Drill a 6th hole slightly off to the side. This will anchor your wire when you start actually making the ornaments.


  7. Insert nails into each hole.

TO MAKE THE ORNAMENTS

You’ll need: 2-3 pieces of fairly soft colored wire (the kind you buy in the jewelry-making section of the craft store is best).  We used different combinations of 20-30 gauge wires.  Each piece needs to be about 9 feet long.  Also, you’ll need wire cutters and possible needle-nosed pliers.
  1. Line the pieces of wire up and create one bundle with them.
  2. Anchor one end to the template by wrapping it around that 6th hole, the one that isn’t actually part of the star.
  3. Begin drawing a star pattern with the wire, hooking it around each point of the star. Keep the wire fairly taut, but you don’t necessarily want to create sharp angles at each nail. The looser your wire, the softer the star will look.


  4. Repeat until you have about 2 feet of wire left. We wrapped ours about 5 times, but yours will vary based on the size of the star that you drew for the template.
  5. Now you’re going to wrap the remaining wire around the inside angles of the star. This will keep it from unravelling when pull it off the template. You’re basically wrapping up all of the wire into a neat package. Thread the wire under the star and back over the top, making loops that connect each of the inside angles. Continue until you have about 4 inches of wire left.
  6. Wrap the end around the last point of the star once to hold the shape. Use the remaining wire from the to create a small loop. This is where you can attach an ornament hook or string a pretty piece of ribbon to hang it on the tree. Pull the nails out of the template and remove the star.
  7. Wrap the anchor end of the wire around a point on the star where it won’t be noticeable. Trim any loose edge with the wire cutters.
  8. You can use any extra wire pieces to create a coordinating wire hook


24. Handmade Wind Chimes


Wind chimes can be made out of almost any material. Whatever pleases the eye and makes a wonderful noise can be hung up and enjoyed! Glass wind chimes and metal wind chimes are particular favorites. Or, when creating your own wind chimes, try using some of these materials:
    seashells
    bamboo
    wood
    glass
    keys
    tools
    silverware
    pipe


SILVERWARE CHIME

    This chime makes use of all those odd bits of cutlery that you have accumulated over the years. And it makes a perfect gift for that person who loves to cook!

    MATERIALS

      4 spoons
      2 forks (with some spares, just in case)
      drill
      1/16th inch drill bit
      Needle-nosed pliers
      fishing line
      safety goggles

    INSTRUCTIONS

    Preparing the Cutlery

    1. Put on your safety goggles.
    2. Drill a hole in each of the four spoon handles, approximately 1/8th of an inch from the top. Sand holes down with metal file, so that there are no sharp edges.
    3. Choose one fork to be the hanging fork from which the spoons will be suspended. Drill a hole in the flat part of this fork, just above the tines.
    4. Using your needle-nosed pliers, carefully bend the tines of the fork to a 90° angle.
    5. Bend the two inside tines of the fork so that they are pointing north and south. Bend each of the two outside tines so that they are pointing east and west. Be sure to have backup forks, in case any of the tines break.
    6. Using the tip of your pliers, carefully twist the ends of each of the tines into a loop.
    7. Bend the handle of the fork over to make a hook to hang the chime with.
    8. Drill a hole in your base fork. This hole should be about 1/8th of an inch from the top of the handle.

    Hanging the Chime

    1. Tie a piece of fishing line from the hole in the hanging fork to the hole in the base fork. The base fork should hang about six inches down.
    2. Tie fishing line through each of the holes created by the tines of the hanging fork. Tie the other end of each piece of string to the hole in each spoon. The bowl of each spoon should hit the stem of the base fork.
    3. Now you're ready to hang them

COPPER PIPE WIND CHIME

    This elegant copper pipe wind chime will add a touch of style and hint of music to any garden or patio.

    MATERIALS

      12 feet of copper tubing (this can be found in the plumbing section of your local DIY|hardware store)
      metal crimper (also found at your DIY|hardware store)
      drill
      1/4 inch drill bit (you want one that is good for drilling into metal)
      1/2 inch drill bit (to drill into the two round wood pieces)
      safety goggles
      roll of string
      three feet of nylon rope
      two round pieces of wood (small, and large)


    INSTRUCTIONS

      This wind chime uses a round piece of wood from which the copper pipes are suspended. The smaller piece of wood is then hung in between the copper chimes. When the wind blows, the chimes knock against the wood, creating sound.

    1. Cut six separate pipes from the copper tubing at the following lengths:
      • 18 inches
      • 20 inches
      • 22 inches
      • 24 inches
      • 26 inches
      • 28 inches

      - To do this, you need to mark these measurements on the tubing and, using your metal crimper, cut the six pipes.
    2. Wearing your goggles, drill a ¼ inch hole in the top of each pipe. This hole should be about a ½ inch from the top of each pipe.
    3. Drill a ½ inch hole in the center of the large and small pieces of wood.
    4. Drill six ¼ inch holes around the perimeter of the large piece of wood. These holes should be equidistant from one another. This piece of wood will act as the platform for the chimes.
    5. Using your string, thread each pipe through each of the six holes on the large piece of wood. The pipes should hang a couple of inches from the base of the wood platform.
    6. Using your nylon rope, create a loop from which to hang the chime. Thread the end of this loop through the center of the wood platform. To the base of this handle, tie the small piece of wood. The pipes will knock against this wood to create sound.
    7. Hang and enjoy!


Reources: Repair Home 


23. Embroidered linens


MATERIALS
    Tea towels, Hand towels, Napkins, Pillow cases, Handkerchiefs (whatever you'd like to embroider)
    Embroidery transfer (can be found at any fabric or craft store - makes your life SO much easier)
    Iron
    Embroidery thread, needle
    Embroidery hoop
    Scissors

INSTRUCTIONS
  1. Set the iron temperature to high. Lay down your tea towel, Pillow case, etc. and place the transfer face down where you would like it to be. Make sure to leave enough room so you can attach the hoop.
  2. Tape or hold the pattern firmly in place and glide the iron over the design. You need to do it only two or three times, pressing hard so a light trace of the design will appear. Don't make it too dark because you don't want it to show after you've embroidered it.
  3. Peel off the transfer and save it for future use.
  4. Attach the hoop around the design, so that the fabric is tight like a drum.
  5. Thread the needle with a 12-inch strand of thread. Leave a 1-inch tail extending from the top of the needle and tie a knot at the other end.
  6. Find your starting point and bring the needle up through the bottom of the design and out the top. Bring the needle back down. Continue the process until you've outlined the entire design, switching thread colors as desired.
  7. When you finish, turn the piece over, snip the thread, tie it in a knot at the base of the fabric and snip excess. Iron the towel so it is crisp.


For more embroidery patterns, check out Andrew Schapiro's Sublime Stitching: