

1.

Instagram Hexagon Frame
(from Oleander + Palm)
You'll Need:
1 • 12"x12" shadow box frame
1 • 12"x12" piece of scrapbooking card stock (plain color)
11 of your favorite Instagram photos, printed to 2.5"x2.5"
An Xacto knife
The Hexagon mat template (or a Cricut cutter)
Tape
Instructions:
- Create a hexagon template (either using Cricut Craftroom or by drawing and cutting out hexagon shapes).
- Cut out your hexagon windows (you'll place your photos behind the mat so the hexagon shapes frame the images).
- Print your Instagram photos. If you don't have a printer and photo software, you can have Walgreens, CVS, or any number of places print the photos out for you.
- Arrange the images as you like. Trim as needed and tape to the back of the mat.
For full instructions, visit Oleander + Palm.
*You can use other shapes as well. Heart-shaped mat openings would be particularly cute for Valentines Day.
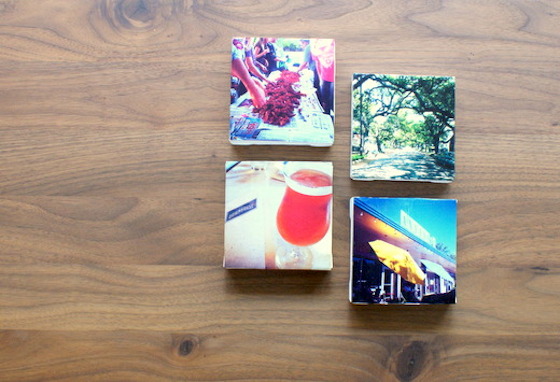
2.

Instagram Coasters
(from Red Ember)
You'll Need:
4 • 4"x4" plain white tiles
felt pads
Mod Podge
Foam brush
4 Instagram photos printed to 3.5" x 3.5"
Instructions:
- Print and cut out your Instagram images. If you want a slight frame around the images, print them smaller than the dimensions of your tiles.
- Brush a thin layer of Mod Podge on the tile, then lay the printed photo on top (facing up). Smooth it out with your hand to ensure there are no bubbles underneath. Let dry slightly.
- Brush a top coat of Mod Podge over the image. Let this coat dry for 20 minutes then brush another coat of Mod Podge over the image. Do this one more time. Watch for bubbles.
- Your brush strokes will be visible, so either brush in only one direction, or play around with the brush strokes so they fit with your image.
For full instructions visit Red Ember.
3.
Instagram Mini Canvas Art
(from Craft Foxes)
You'll Need:
4"x4" Canvases (you can find these at craft stores)
Instagram photos printed to 4"x4"
Scissors
Mod Podge
Foam brush
Instructions:
- Print and cut out your photos
- Paint a layer of Mod Podge on your canvas and place the photo on top (facing up). Smooth out the image to ensure there are no air bubbles.
- Brush more Mod Podge over the top of the images, working from the center out.
- Let dry (the Mod Podge will be cloudy until it dries).
For full instructions visit Craft Foxes.
4.

Instagram Custom Calendar
(from Alice and Lois)
You'll Need:
Calendar Template [2017 PDF]
White card stock (to print the calendar on)
Scissors or Xacto knife & straight edge
12 Instagram images printed to 4"x4"
Glue stick
Instructions:
- Print out the calendar template onto your white card stock. Two calendar pages will print on one 8.5x11 piece of card stock.
- Cut the card stock in half.
- Print your photos and trim them out.
- Glue the photos to the calendar.
For the full instructions (and updated calendar templates) visit Alice and Lois.
5.

Instagram Cards
You'll Need:
Instagram photos printed to 4"x4" (or slightly smaller if you want a border)
Card stock cut to 8"x4"
Scissors
Glue Stick
4"x4" envelopes
Instructions:
- Print your images out to the size you like and trim them.
- Cut your card stock and fold it in half so the final dimensions are 4"x4".
- Glue your Instagram image to the front of the card.
You can find alternate instructions at Say Yes.
6.

And, of course, there's always the Instagram Magnets that I posted about recently.
No comments:
Post a Comment